Clever UE4 Hologram Material
This tutorial was first published in my Artstation page where you can find better quality video and shots: https://www.artstation.com/artwork/Qz11XB
Idea for this material came during working with our projects where I needed to have a solid and fast workflow for generating holo elements in our project. I´ve been iterating more with it and this is the current stage. Because it´s not that easy to walk you through the whole process you can download these files here and then follow this tutorial to understand how it works.
Disclaimer! This material is not yet fully optimized and there are still steps in this tutorial that are going to evolve so use this tutorial as an idea for something similar. End result will not be optimal for elements that needs to be clear to read and will not be optimal for very small details. Main purpose for this is to create a visual pleasing medium/large elements for example Cyberpunk themed logos for buildings and such.
Main Concept
Main idea is to use a 2d texture tweaked in Substance Designer and then import that to UE4 where we are going to use that in a complex material that creates an illusion of hologram depth.
First Step
The very first step is to have your texture done. Keep in mind that this whole workflow will be based on the brightness of your texture. This means that darker values will be less noticeable and brighter values more prominent. For any fully transparent area you want to have it would require a fully black value so that´s why we are going to keep our texture background black. Basically you can use MS Paint, Photoshop, Illustrator etc... for making this texture.
Substance Designer Graph
We are going to use Substance Designer as a fast step between our 2d application and UE to prepare it for our UE4 material to use. Because our aim here is to create a hologram material the first step we are going to focus on is the depth/height data. Our end result will be applied to a simple plane so we need to fake as much height as possible to hide that fact. This same height data will be used as an alpha too because this way we get that nice gradient smoothing.
Depth
We will take our texture and use the Histrogram Scan node to scan good values out of that texture to be used for the depth data. In this case I used a value of 0.75 for Position. Then we can start to generate random depth values. To do this we are going to use Flood Fill node to isolate different elements. After that we can start to generate random gradient values based on that using Flood Fill to Gradient node. I used 1 for Angle Variation. To finalize this it´s a good idea to smooth the results because otherwise we will get artifacts with our UE4 material later on.
Now we can use Distance node to create the actual holo depth. I used a value of 15 but it´s up to you how strong you want the holo effect to be. Then we are going to multiply this with the random gradient output we created earlier. This will result more interesting looking depth with variations where different elements are facing. Last step is going to be the detailed bevel effect. We will use a Bevel node for that and I used a Distance value of -0.005 because we only want the fine details. Then we are going to subtract this from the Histogram Scan so we are left with only some edge details. Then we will blur this results and use Histogram scan once again to find the right amount of details we want. Final step for our depth is to combine this with rest of the nodes by using a Blend node with Max (Lighten) as a Blending Mode so we only get the bright values.
Albedo
For albedo or base color we want to make sure we have enough edge bleeding to handle the depth. In other words we want to fill our albedo in a way that when our UE4 material is using that depth value, colors would still work as expect and no black values should appear.
Use the Bevel node we created earlier and take the results from that and plug it in a Histogram Scan node. We want to make sure the results are binary (pure black/white or 0/1) so crank the Contrast value full 1. Then use a value of 0.05 for Position but again this will depend on your texture so prepare to find your own value here. Use that result and plug it into Distance node and for Source Input we will use our imported texture. For Maximum Distance use a value like 1000. Now every black area in our texture is filled with bleeding colors.
This result is very binary so the next step is to smooth that out using a neutral color and lerp that with our depth data. One handy way to get that neutral color is to use a HQ Blur node and a very high value like 1000. Then just simply mix these together with a Blend node using our depth value plugged into a Histogram Scan node and that node plugged into the Opacity slot.
That´s all we need to do in Substance Designer and we can now export albedo and depth textures. It´s important to pack that depth value into the alpha channel of our albedo/base color texture.
Unreal Engine Material
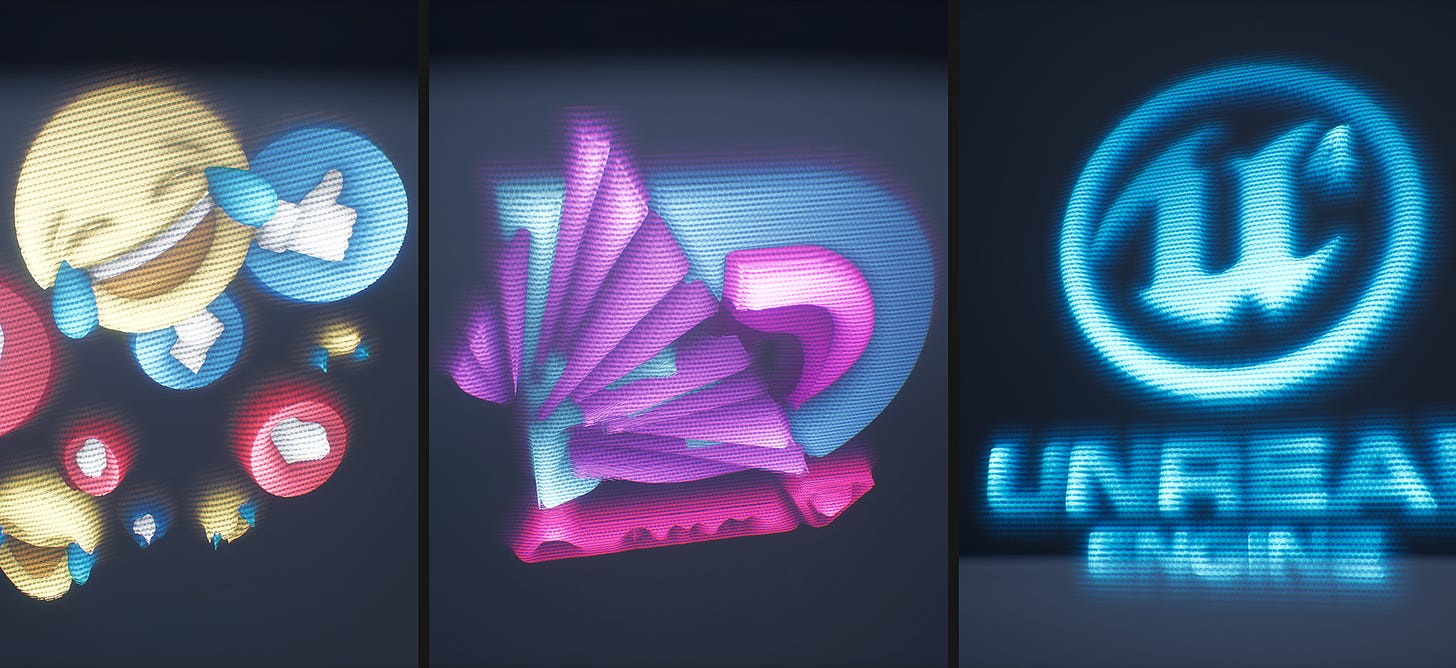
Holo material is going to use a transparent blending mode and unlit shading model. It will also support various features like distance field warping (distorting when something goes through it), micro details and a dissolve effect that allows to animate it appear/disappear. Because this material is fairly complex I will provide you with a small UE package that contains everything you need but here is the main concept.
Depth Effect
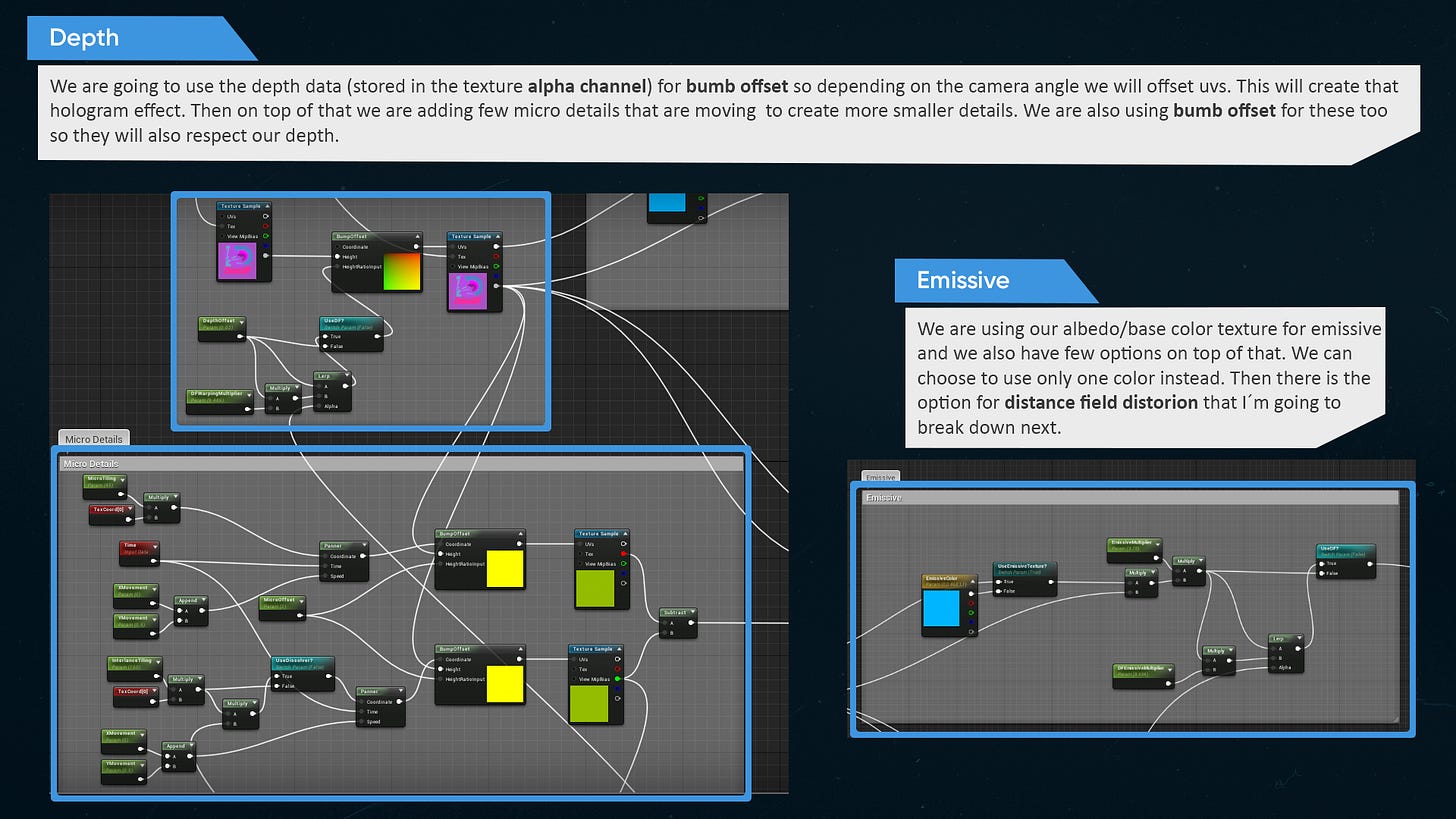
We are going to use the depth data (stored in the texture alpha channel) for bumb offset so depending on the camera angle we will offset uvs. This will create that hologram effect. Then on top of that we are adding few micro details that are moving to create more smaller details. We are also using bumb offset for these too so they will also respect our depth.

Emissive
We are using our albedo/base color texture and then have few options on top of that. We can also use only one color instead. Then there is the option for distance field distortion.
Distance Field Distortion
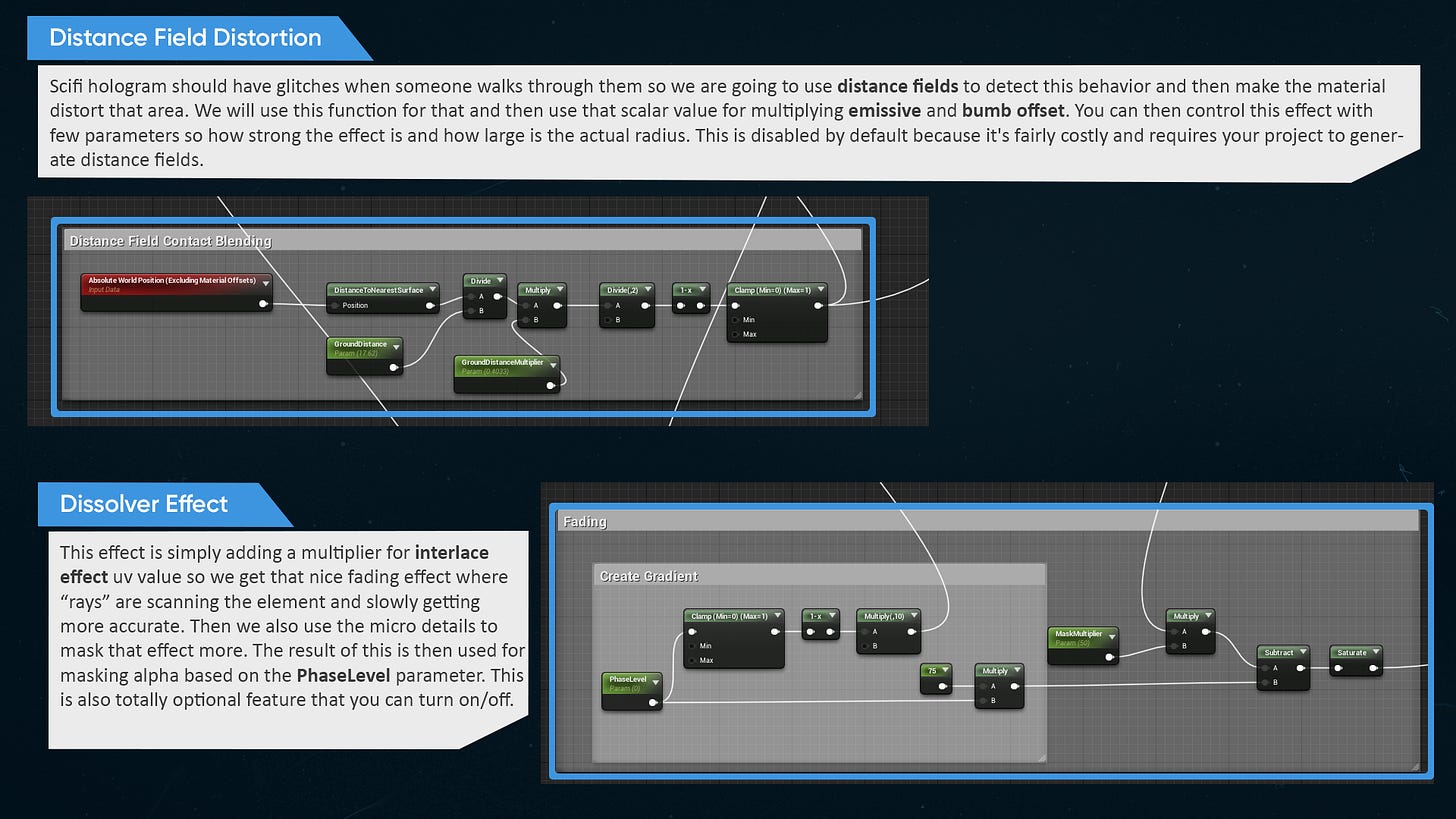
Scifi hologram should have glitches when someone walks through them so we are going to use distance fields to detect this behavior and then make the material distort that area. We will use this function for that and then use that scalar value for multiplying emissive and bumb offset. You can then control this effect with few parameters so how strong the effect is and how large is the actual radius. This is disabled by default because it's fairly costly and requires your project to generate distance fields.

Dissolver Effect
This effect is simply adding a multiplier for interlace effect uv value so we get that nice fading effect where “rays” are scanning the element and slowly getting more accurate. Then we also use the micro details to mask that effect more. The result of this is then used for masking alpha based on the PhaseLevel parameter. This is also totally optional feature that you can turn on/off.
Opacity
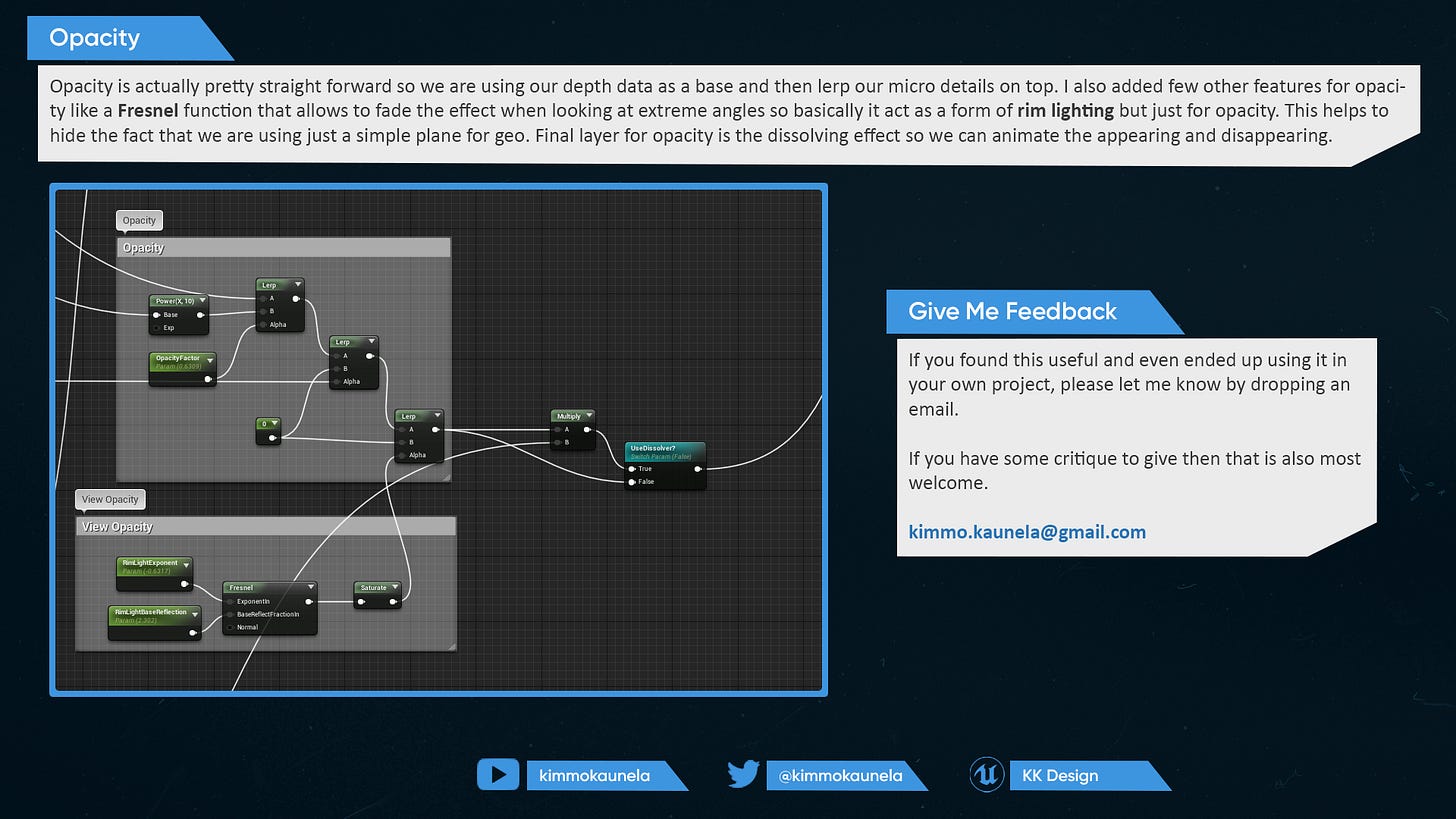
Opacity is actually pretty straight forward so we are using our depth data as a base and then lerp our micro details on top. I also added few other features for opacity like a Fresnel function that allows to fade the effect when looking at extreme angles so basically it act as a form of rim lighting but just for opacity. This helps to hide the fact that we are using just a simple plane. Final layer for opacity is the dissolving effect so we can animate the appearing and disappearing.

That´s all for this time and drop me a comment or email (kimmo.kaunela@gmail.com) if you find this useful and want me to make more.
Until next time,
Kimmo K.
You can also find me in the following places too:
UE Marketplace Artstation Twitter Facebook Youtube


